In our previous post we demonstrated that the ESP32 chip is vulnerable to EMFI. We used this to bypass the Secure Boot implementation of the ESP32. During this post we also shared already that our goal was to put our previously conducted research, where we turn Data Transfers into Code Execution, into practice.
When a target is undergoing a Fault Injection attack, it's extremely difficult to guarantee that the hardware operates as intended. This subverts a fundamental assumption of software engineering, where it's assumed that the hardware always flawlessly executes the instructions. Fault Injection attacks undermine the execution of software at the lowest level.
As a result, any software security model is likely compromised when the correct execution of software cannot be guaranteed. Fundamentally, this is the reason why Fault Injection is so effective in attacking modern devices as they rely on security implemented by software.
The key idea of “Turning Data Transfers into Code Execution” is to inject a glitch into the target while it's copying controlled data, in order to set the processor's program counter (PC) to an arbitrary value. This gives an attacker a powerful primitive which can almost always be used to achieve code execution.
Most devices copy data from external non-volatile memory (e.g. flash) into volatile memory (e.g. SRAM or DDR) during boot. The data stored in non-volatile memory is usually modifiable by an attacker with physical access. Interestingly, even though the source, destination and length of these copy operations are often carefully checked, the data itself being transferred is generally not considered a security risk.
In this post, we demonstrate an attack on the Secure Boot implementation of the ESP32 where we load attacker controlled values into the PC register using EMFI. This allows us to achieve code execution in the context of the ROM code.
Controlling PC using Fault Injection
Our research at FDTC in 2016 already pointed out that it's trivial to load arbitrary values into the PC register of ARM32 chips using Fault Injection. On this architecture the attack was easy as the PC register is directly addressable. Moreover, the load multiple instructions (i.e. ldm), used on ARM32 for efficiently copying data, were easy to glitch due to their encoding (i.e. a bitmap is used).
The processor architecture of the ESP32, Xtensa LX6, does not support direct loading of immediate values to the PC register. Therefore, the ARM32 specific attack is not portable as-is. Nonetheless, we already know, as we presented in 2019, that variants of this attack are applicable to most, if not all, other architectures as well.
As you will realize in this post, we just have to load the values indirectly…
Attack hypothesis
Our Fault Injection Reference Model (FIRM) breaks down complex Fault Injection attacks in multiple comprehensible stages. It can be used to make a hypothesis about the attack we have in mind as is shown below.
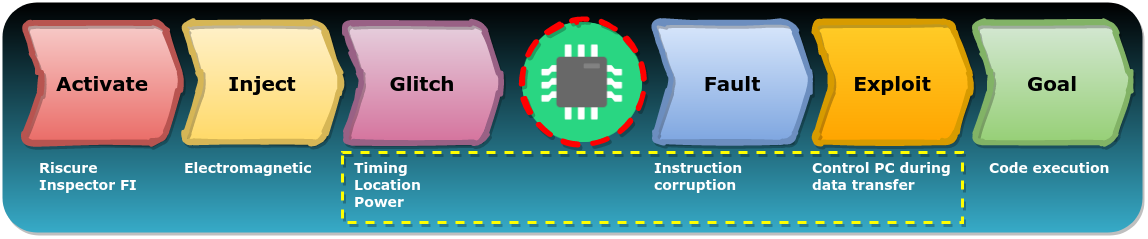
It's important to realize that, compared to the previous attack, we only change the Glitch, Fault and Exploit stage of FIRM whereas the other stages remain the same. Therefore, any knowledge obtained from the stages that did not change, can be reused.
Moreover, it's important to realize that not all Fault Injection vulnerabilities are alike. There are many nuances, many of which are not studied yet thoroughly. For example, using a different Fault Injection techniques, or even just different glitch parameters, likely trigger different (hardware) vulnerabilities, causing different type of faults. The result is a multitude of different applicable Fault Models which can lead various exploitation strategies.
We believe FIRM is useful for both offensive and defensive endevours related to Fault Injection attacks. Please read our post about FIRM if you are interested in more details.
Road to …
Probe location
We used the same equipment as during the attack we described in our previous post. We already know that the ESP32 is vulnerable to EMFI. For this attack, we assumed that the (hardware) vulnerability we exploited during the previous attack would allow of to perform this attack as well. Therefore, left the EMFI probe at the current location, assuming it would yield the type of fault we need. Moreover, by targeting the same location, we also know the Glitch Power to use for triggering the (hardware) vulnerability.
Flash modification
For this attack, our goal is to load an arbitrary value into the PC register while the processor is copying data. This means we need to make the processor operate on data that is under control of the attacker. We achieve this by simply overwriting the entire bootloader with arbitrary data. The processor will happily copy this arbitrary data as it's copied before the signature is verified and the changes can be detected.
To identify a successful attack, we fully overwrite the bootloader with the 32-bit pointer to a ROM function that prints something on the serial interface. The successful execution of this function generates the printout on the serial port, which confirms we have successfully loaded one of the pointers stored in external flash into the PC register.
Moreover, as the entire bootloader is fully overwritten with the same pointer, the glitch timing requirements are practically removed and we can simply glitch (almost) anywhere during the bootloader copy.
We use the ROM function at address 0x4005A980. This function prints the following string on the serial interface: Falling back to built-in command interpreter.\n. A snippet of the original flash image and the modified flash image is shown below. Please note that the address pointer is stored in little endian format in the external flash.
+ Original:
+     00001040    00 50 04 FF AC 00 00 00 48 65 6C 6C 6F 2C 20 49
+     00001050    20 61 6D 20 74 68 65 20 62 6F 6F 74 6C 6F 61 64
+     <cut>
+     00007850    EE E0 08 00 06 02 00 00 0C 1A 81 5B EE E0 08 00
+     00007860    81 95 EE C0 20 00 88 08 F7 68 EC 1D F0 00 00 00

- Modified:
-     00001040    00 50 04 FF AC 00 00 00 80 A9 05 40 80 A9 05 40
-     00001050    80 A9 05 40 80 A9 05 40 80 A9 05 40 80 A9 05 40
-     <cut>
-     00007850    80 A9 05 40 80 A9 05 40 80 A9 05 40 80 A9 05 40
-     00007860    80 A9 05 40 80 A9 05 40 80 A9 05 40 80 A9 05 40
Glitch timing
The trigger, derived from activity on the external flash bus, was reused. As you can see in the picture below, we generate the trigger (in red) from the activity on pin1 of the flash (in blue), in similar fashion as during the previous attack.

We know that the bootloader is copied at the end of the flash activity. Therefore, we inject the glitches in a small attack window during the copy of the bootloader which is shown in the above picture.
Attack cycle
When we are successful, one of the address pointers originating from flash is loaded into the PC register. We take the following steps for each experiment.
- Reset chip
- Wait for trigger
- Inject glitch with randomized parameters (i.e. power, delay)
- Read UART output
- goto next experiment
Results
Unfortunately, after more than 1 million experiments, which touch roughly 2 days, we observed no successful glitches. This made us conclude that the above approach does not work and that the glitches we injected were unable to cause the fault that we need.
During our previous attack we did not anticipated a specific type of fault. We were simply happy when we observed the modified bootloader was executed. Moreover, we were not that interested in what the effect exactly was (i.e. type of fault).
However, for the attack described in this post, we need a specific fault to be successful. To be precise, we need a fault that allows us to modify one of the load instructions when it's operating on controllable data (i.e. data from flash). We simply need a fault that causes Instruction Corruption.
Like we anticipated in the beginning of this post, there are many nuances to consider when conducting Fault Injection attacks. Therefore, it's important to never give up as there is always something else to try and success may not be that far away.
Road to success
Of course, we walk the walk, and therefore we never give up, especially not during Fault Injection related endeavors. There are simply too many variables available to us before we run out of things to try. One risk that's always present when conducting Fault Injection attacks is to rush and minimize the glitch parameter search space too early.
Moving the probe
Therefore, after being unsuccessful, the first thing we gave up was our fixed location for the EMFI probe. We decided to perform the described experiment while moving the probe across a 30 x 30 grid across the chip's surface.
Interestingly, after a day's worth of testing we observed an unexpected string bring printed while surveying a completely different physical location. Even though not successful, an alteration in the expected behavior of the chip merits being further investigated.
We decided to position the EMFI probe at this newly identified location in order to investigate it thoroughly and determine if it will yield the fault we need.
Getting success
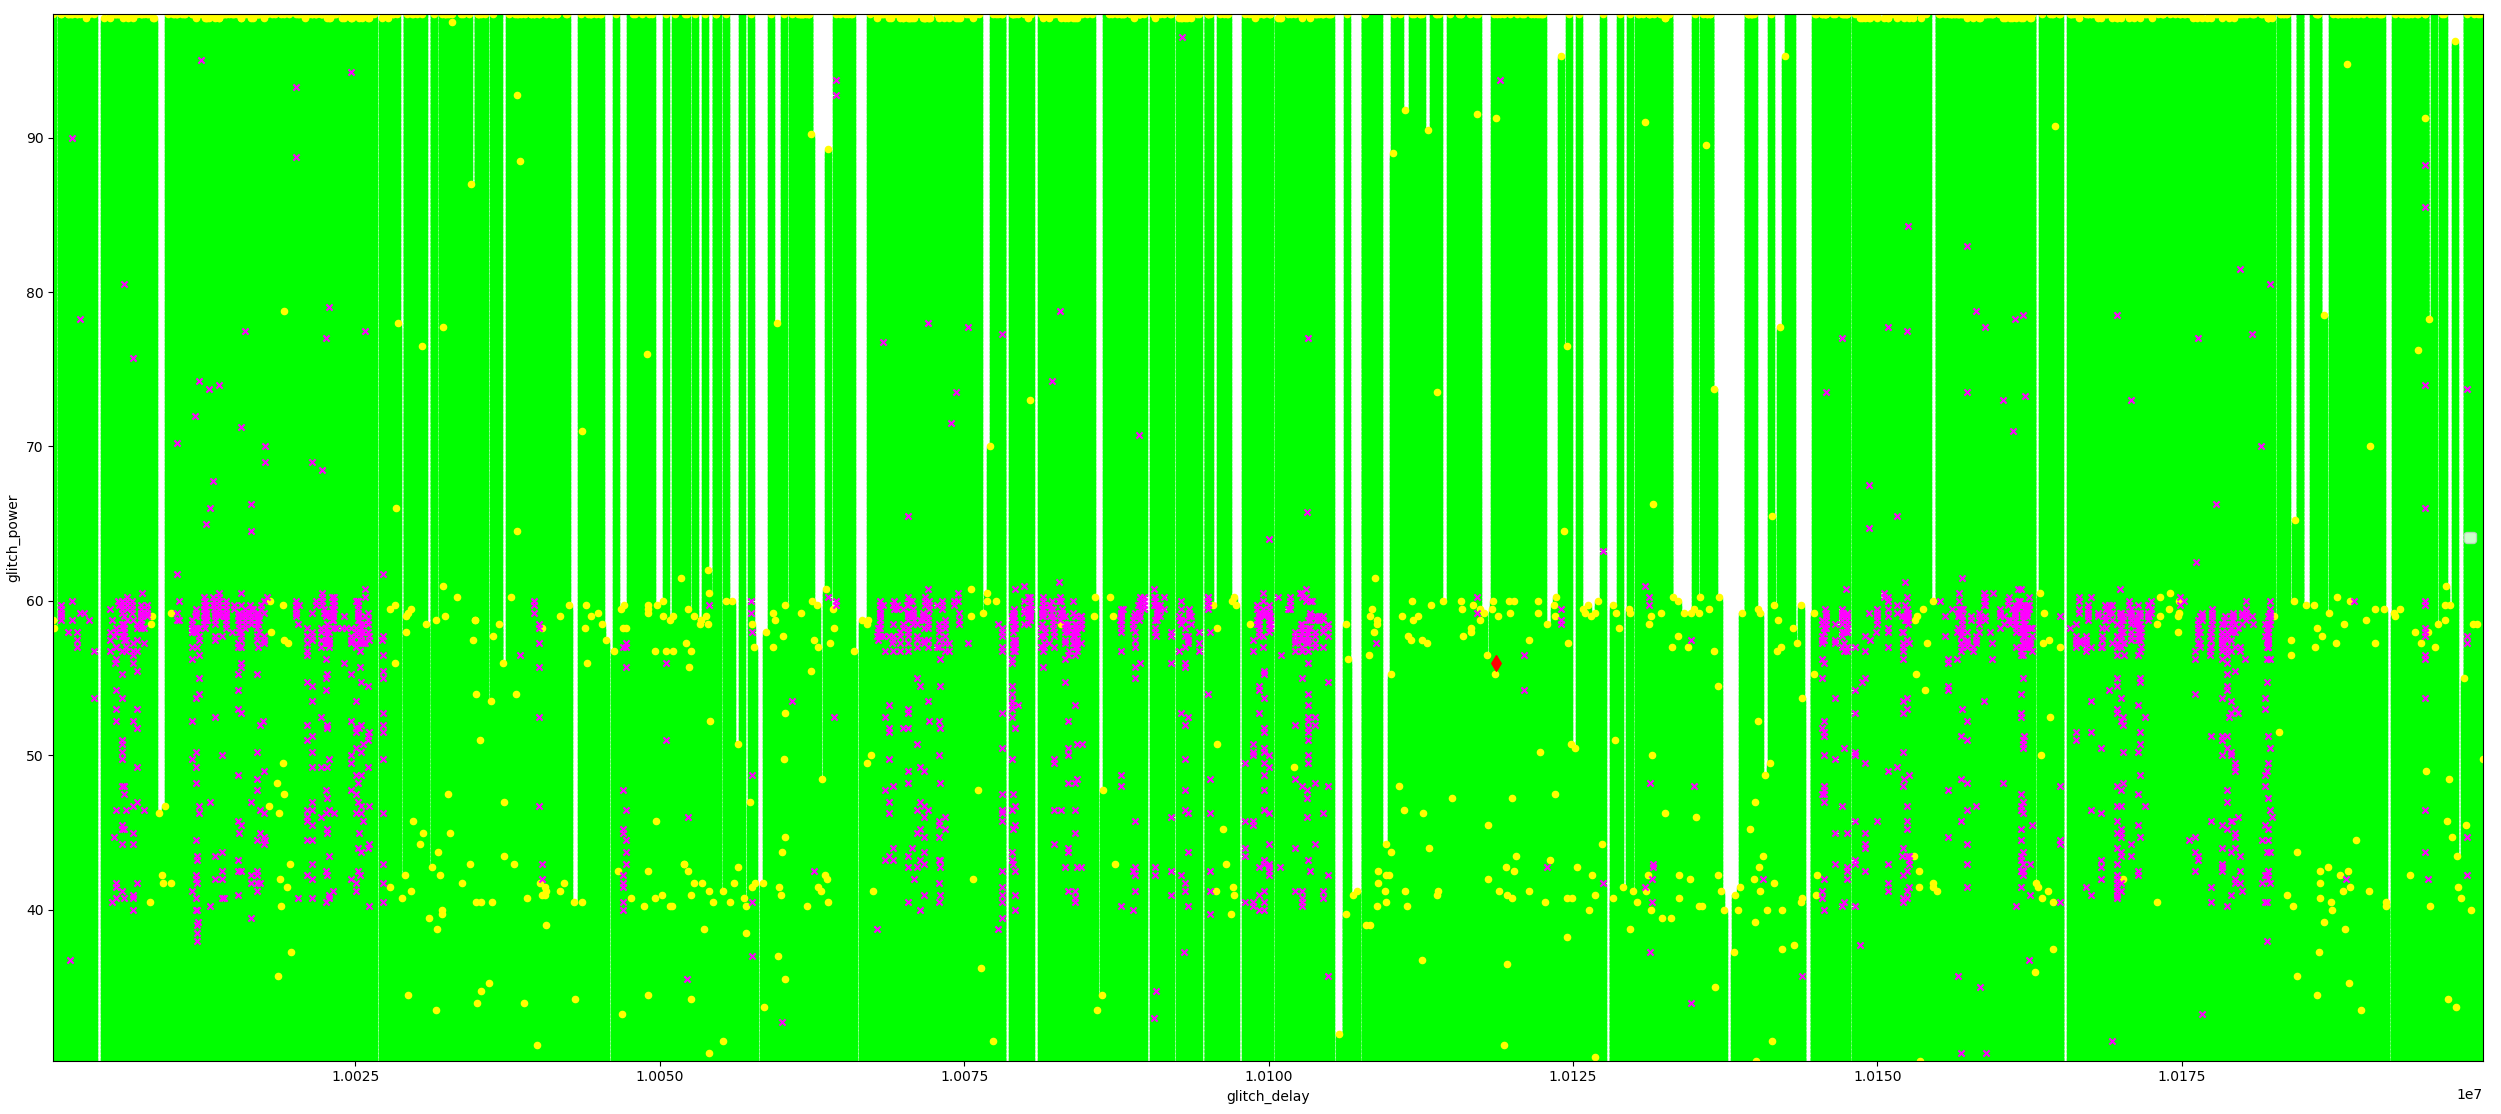
The picture below show the experiments labeled as expected (●), success (◆), csum err (x) and reset/mute (●). The X-axis shows the glitch delay relative to the trigger, while the Y-axis shows the glitch power. After roughly 300,000 experiments performed in circa 12 hours, we observed a successful glitch where the function in ROM is executed.
The results of this campaign are shown below.
| Type | Count | Percentage |
|---|---|---|
expected |
301077 | 98,82 |
success |
1 | 0,0003 |
csum err |
2091 | 0,67 |
mute/reset |
1516 | 0,50 |
The csum err occurs as the ROM code is calculating (and verifying) a checksum before the Secure Boot check itself. The glitch we inject impacts the checksum calculation after which the checksum verification fails.
Increasing the success rate
To increase the success rate, we fixed the glitch parameters to that of the successful glitch. After roughly 100 minutes, we observed 251 successful glitches where we load a controlled value in the PC register. It shows that the reproducibility for this attack is significant once the glitch parameters are identified.
| Type | Count | Percentage |
|---|---|---|
expected |
56867 | 97,04 |
success |
251 | 0,43 |
mute/reset |
1482 | 2,53 |
The picture below show the same experiments over time. You see that the success rate is not the same within this 100 minute window. It's important to realize that Fault Injection attacks are affected by many variables and therefore the success rate is typically not constant, especially not over longer time periods.

To conclude, we achieve a success rate of 2.3 successful glitches per minute.
Why does this work?
Well, that's a good question which is not that easy to answer. We know from reverse engineering the ROM code that a fairly complex copy loop is implemented, which copies the bootloader in chunks from the external flash into internal memory. This copy loop is basically a wrapper around a memcpy() function.
Interestingly, the Xtensa architecture uses register a0 as the function return address (i.e. when the retw.n instruction is executed). The memcpy() is implemented using l32i and s32i instructions as is shown in the picture below.

Using a glitch that causes instruction corruption, it may be possible to corrupt the operand of a l32i instruction allowing to load an attacker controlled value into a0 instead of the original register that is used. This would effectively set the PC to a controlled value when the function returns.
We would not bet our lives on it, you should neither, but we have good confidence this hypothesis is correct.
Next steps
Exploiting this vulnerability is trivial as we can replace the plain-text bootloader with pointers and code. Then, we leverage the vulnerability to load one of those pointers into the PC register in order to execute the code. However, Espressif actually advices their customers to use Secure Boot in combination with Flash Encryption for secure devices.
Interestingly, the Flash Encryption feature is implemented entirely in hardware. It actually operates transparently to the processor. This means the encrypted data stored in external flash will never reach the processor. In other words, the load and store instructions will not operate on the attacker controlled data in external flash. Once the Flash Encryption feature is enabled, the data originating from external flash will always be decrypted before it reaches the processor.
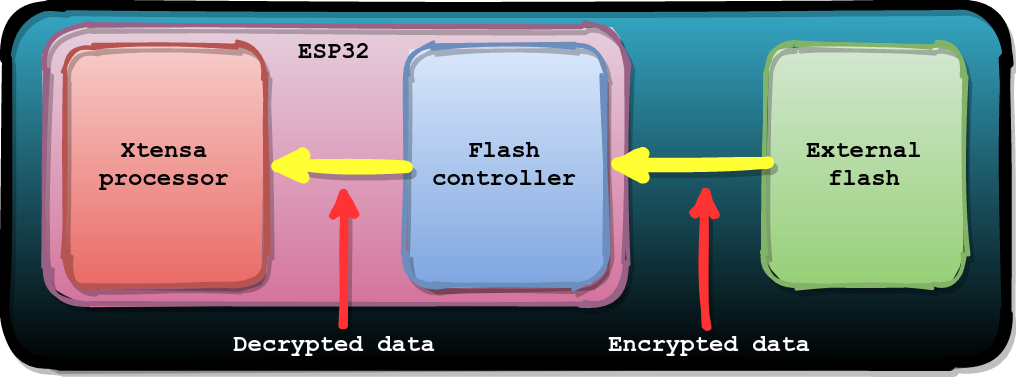
The Flash Encryption feature itself does not mitigate the (hardware) vulnerability. Nonetheless, effectively, it makes exploiting the vulnerability a lot more difficult as it prevents overwriting the plain-text bootloader with arbitrary code or data.
In our next post, we show that this vulnerability can still be exploited with Flash Encryption enabled by leveraging another vulnerability (i.e. CVE-2020-15048).